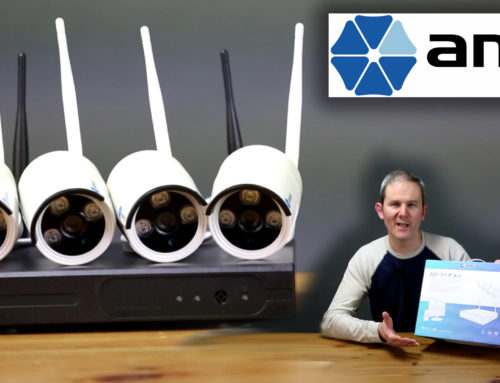
Today we are unboxing and setting up this all-in-one security camera system solution including 4 cameras and digital recorder from Anni.


5MP PoE Home Security Camera System CCTV Video Monitoring Surveillance DVR Kit PoE Wired Outdoor IP Cameras, 8-Channel NVR Video Surveillance System for 24/7 Recording, No Hard Drive
First off, let’s set some expectations. This is a beginner’s security camera setup for someone who wants a cost effective and low-effort system installed in their home or business. This is a non-technical solution with little configuration required, unlike some of the other systems I have been showing on this channel. Everything you’ll need is included in this box. I’ll post a link on my blog in the description below on where I picked this system up. It’s $200 US right now on Amazon and not a bad price for an all-in-one solution with some special features. Let me show you what that gets you.
You have 4 cameras, each supporting 20 meters of night vision. These are 2MP 1080N AHD Cameras (The 1080N means the width of the image is 1080 pixels and the AHD is Analog High Definition). Since these are not IP cameras, which removes that level of technical complexity for some.
In addition to them working as cameras, 3 of them each have additional features. There is also an DVR or Digital Video Recorder included with a 1 TB hard drive preinstalled in this kit. This is where you would record and playback your cameras’ footage. This one holds about 1 week of footage and older footage will be automatically deleted and replaced by newer footage. Some models don’t come with a hd, so be sure you have a separate hd to install if you order one with the disk included. And no, you cannot use an external harddrive over USB.
You will notice that these cameras are wired with a BNC and a power supply. I’m always a fan of a wired solution for dependability and reduced lag when you are constantly transferring so much data.
So where do we install this? You are limited to the 60ft from the DVR for each camera, but if you pick the best centralized location, you can maximize the reach of these cameras. For me, installing the wiring is the more challenging part of any camera setup. Try to take advantage of drop ceiling, vents, the space where carpet and baseboards meet, along the edge of eaves or vinyl siding.
Besides a home, I can picture these cameras installed in service bays, small restaurants or any small business where there is any drop ceiling or open ceiling to run these wires easily. 3 cameras covering the cash, customer area and front and one in the back room. There are lots of options depending on your floorplan.
The DVR setup is straight forward and I accepted all default values and the cameras are recording continuously. It looks like everything works, so let’s set up this system in a good test location get some real footage.
I’m going to set mine up here in the garage with 2 cameras inside and 2 out. I recommend testing your cameras’ locations first prior to drilling holes to make sure your happy with the location and point of view.
The daytime footage for the various locations I have temporary setup these cameras. It doesn’t look bad for a $200-$250 beginner system. The lenses seem to me 2.8mm
And for comparison, all on one screen, here is the inside view in the dark and then of course the outside. I turned off the IR lights from my other cameras and the lights on my house, so it’s pitch black outside.
5MP PoE Home Security Camera System CCTV Video Monitoring Surveillance DVR Kit PoE Wired Outdoor IP Cameras, 8-Channel NVR Video Surveillance System for 24/7 Recording, No Hard Drive
Alright guys, that was super easy and not a bad quality system for the price. Someone without technical knowledge could easily set this up in their home and I could see this system coming in handy at a small business like a restaurant or body shop. Don’t forget to checkout the links in my blog if you want additional information on this product or want to check out my other security camera projects. I’ll also drop an Amazon link in the description below. If you found this information helpful, please like and subscribe. Thanks for watching.