Hey Guys,
Today we checking out another security camera by reolink. It’s a 5MP dome with 4X optical zoom. Model number RLC-422. Let’s review the features, set it up on my phone and NVR and test out that daytime and nighttime footage.


Reolink PoE Camera 5MP Super HD 4X Optical Zoom Vandal-Proof IK10 Work with Google Assistant, Security IR Night Vision Motion Detection Waterproof for Outdoor RLC-422
(as of April 1, 2026 20:33 GMT -06:00 - More infoProduct prices and availability are accurate as of the date/time indicated and are subject to change. Any price and availability information displayed on [relevant Amazon Site(s), as applicable] at the time of purchase will apply to the purchase of this product.)Yes, I was so happy with my first review of a reolink camera, I decided to do another. I am a big fan of their products because of their high quality and ease of setup. The camera comes in at just $100 US and he’s what you get for that price.
Before I get mine installed in a couple test locations, let’s setup it up on my iPhone. We’ll power it up and connect it to my home network by connecting it to a PoE switch.


YuanLey 4 Port Gigabit PoE Switch, 1 Uplink Gigabit Ethernet and 1 SFP Port, PoE Plus 802.3af/at, 78W Built-in Power, Fanless Metal Unmanaged Plug & Play
(as of April 2, 2026 19:12 GMT -06:00 - More infoProduct prices and availability are accurate as of the date/time indicated and are subject to change. Any price and availability information displayed on [relevant Amazon Site(s), as applicable] at the time of purchase will apply to the purchase of this product.)Back on the device page, let’s grab my IP address for later use by click on the gear, click info and it’s 192.168.0.144. Perfect, the camera is on my subnet without any manual effort.
We already have a micro SD card installed in the camera, so let’s format it and record motion onto it. This is a great setup if you don’t have a network video recorder.
Let’s confirm we are recording on motion by going back to the settings page, click record and the toggle is on.
To access the recordings on the card, go to the live view page and click the playback button. Click on the icons where motion was detected or slide the red arrow on the timeline and press play. Good job on the layout here where you can select the date from the calendar or use the date selector to change days.
To turn on motion notifications, turn on the Push option on the settings page.
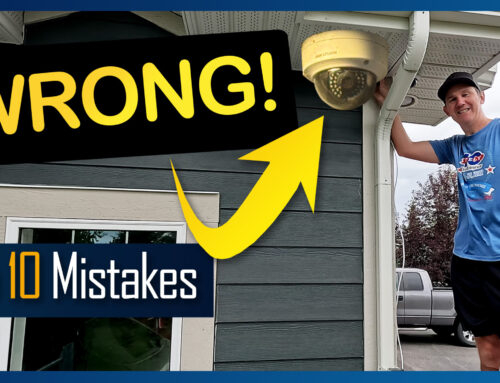
Our first test location is here over the front door looking at the driveway. If I were to install this camera here permanently, I’d attach it to the soffit. When mounting and pointing the camera, keep in mind that if you tilt the camera lens to close to the base, the base will be visible in the feed and block some of the IR lights influencing the amount of light in your scene. At 1X zoom, the image quality is perfect. As I walk from 100ft (30m) away, it’s at the 30ft (9.1m) mark where the license plate is readable. At night, the image quality is good and the IR lights seem to be reaching me at the advertised 100ft mark seen by the license plate’s glow but it’s too far to see many details until I reach the 50ft (15m) mark. The reflective plate is blown out due to the IR lights which is expected. I am getting some glare at night. It seems some IR light is reflecting into the lens. The sponge surrounding the lens isn’t tight enough. When I remove the cover, the foggy glare disappears indicating a light leak. I tried rotating the cover and cleaning it out with some glass cleaner but it did not help the glare issue. When zoomed in to 4X, daytime again is great and you can read the plate at 100ft away. At nighttime it took a while for the camera to focus, but once it did, the IR lights were able to reach me and the image lacks some detail but you can see what I am doing. If you have surrounding streetlights or property light on at night, the image would be much clearer.
Too bad the camera’s focus wouldn’t go to the setting of infinity after struggling to focus for 20-30 seconds. Also, when zooming in with my phone, I wish there were preset zoom buttons of 1, 2, 3 and 4 times. It would help avoid the guess work as you can easily over or undershoot the zoom. Speaking of zooming, why are these plus and minus buttons so tiny?
Before moving to my next location, let’s start recording footage on my PC using BlueIris. The camera supports ONVIF which is a standard communication protocol used my NVR software. Since this is not a tutorial on BI, I’m going to add this very quickly.


Hikvision NVR 16CH 16POE to 12MP NO HDD
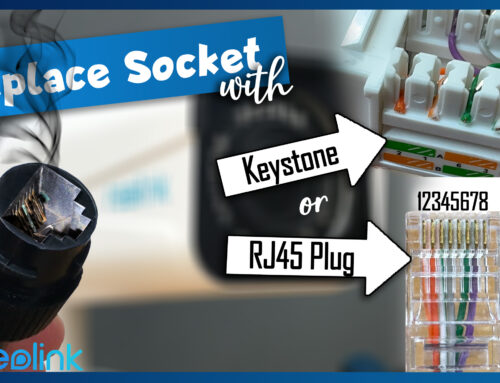
If you need access the camera’s more advanced features, log directly into the camera’s web user interface by navigating to its IP address. You can update ports and make the IP address static. Playback the footage here as well.
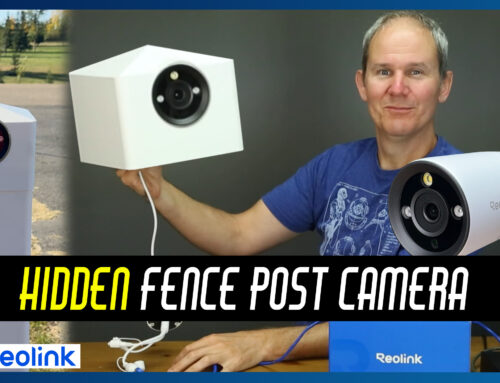
Fence (zoom to front door) – Our next test location is going to involve mounting the camera on my fence, pointing towards my house, 80ft (24.3m) away. I already have a network cable out here, and it’s plugged into my PoE switch on my network. I like this point of view of the driveway and surrounding property when zoomed out. When I zoom in, once it’s focused the image is perfect. I love that this camera can see the wide angle of my property and zoom in when I need to see specific details of my house or someone or something at my door. In another attempt to fix the glare or fogging issue, I placed a silica sac in the camera. Unfortunately, this didn’t impact the image at night. The camera’s IR lights did provide a good image (a little grainy) but again, at this distance it’s hard to pick up details. When zoomed in it took a long time to focus because of the Ring doorbell’s IR lights shining in camera’s lens. When I block it, the focus is much more successful. The image does have some noise but again is pretty good considering it’s totally dark here. With the IR lights off and in complete darkness, the image is very grainy and dark, so you will need to rely on them to light up your scene.
Here is a quick water hose test. The camera did not leak as it’s completely sealed.
Now, let’s look at 24 hours of footage. Pretty impressive.
In summary, I continue to be impressed with the high-quality images that reolink creates. Their hardware is quite durable. The app is super simple to setup and connecting to the camera over WiFi or the cellular network was seamless. I love the fact that the camera is ONVIF compatible so I can store all my footage on an internal micro SD card, my PC or dedicated NVR. Using an SD card to record footage is all you really need so technically, you don’t need to buy a network video recorder. The 4X zoom feature is an awesome selling point and can be quite handy depending on your setup. If you don’t know what lens size to buy, this is a great option because you can adjust the zoom level depending on your setup after the fact. If you need the ability for the camera to pan and tilt, do check out reolink’s lineup of cameras.
I’m not a fan of the focusing time this camera requires to get a sharp image, and in some cases was unsuccessful and I had to re-trigger the autofocus by touching the zoom. Even though the 5MP daytime image is perfect, the nighttime image is a little weak due to the grainy image and the IR glare. Also when I was reattaching the camera’s cover, the star wrench actually scratched the dome cover. Put some electrical tape around the short end if you don’t need it.
I know this is a lot of information. Thanks for reading this post.